| Author |
Message |
Neil_S
Inexperienced

Joined: Feb 05, 2006
Posts: 24

|
 Posted:
Tue Oct 24, 2006 6:17 pm Posted:
Tue Oct 24, 2006 6:17 pm |
 
|
Just did this job today and found some better ways to do it, over what I've read on some Audi sites so thought I'd publish my own guide.
The G62 temperature sensor is a fairly common component to go on the Audi A4, typically this can be diagnosed via vag-com codes such as 17664.
Tools required
Socket set
Small flat headed screwdriver
Pliers
Parts needed
Some G12+ coolant - You can get this from eurocarparts or GSF car parts, 1 1/2 litre for about 5 quid
Some distilled water - You can get this most places, even supermarkets sell it now
Audi parts
A check of the sensor before ordering the parts (a torch is handy) revealed the sensor casing was black (this has been superseeded by a green sensor for which the part number is listed below). On some VAG cars, a blue temperature sensor is installed and this has a separate part number 078 919 501B).
1 x 059 919 501 A - Dual temperature sender
2 x 032 121 142 - Retaining Spring
1 x 903 168 02 N - Round seal
I got these parts from Vagparts for about £20 delivered. I would suggest you order 2 retaining springs. They are plastic clips and you can easily drop them, best to have one extra on hand just in case.
Before you start, make sure the engine is cool. Do not do this on a warm car. It is best if you leave the car overnight to fully cool down first.
(Optional) You may want to remove the plastic engine shield so that any coolant lost during this process falls onto the ground (or suitably positioned tray). I decided instead to leave the engine shield in place and flush the leaked coolant with a watering can. I managed to capture most of the lost coolant for safe disposal. Animals are attracted to the coolant due to it's sweet smell, so it is best to ensure your driveway is flushed of any leaked coolant when finishing this job.
Start by removing the engine cover. Pop off the three caps with a small screwdriver and unscrew the bolts. Lift off the oil dipstick and remove the engine cover, replace dipstick.
In order to make sure all pressure is relieved in the coolant system, remove the cap from the coolant reservoir.
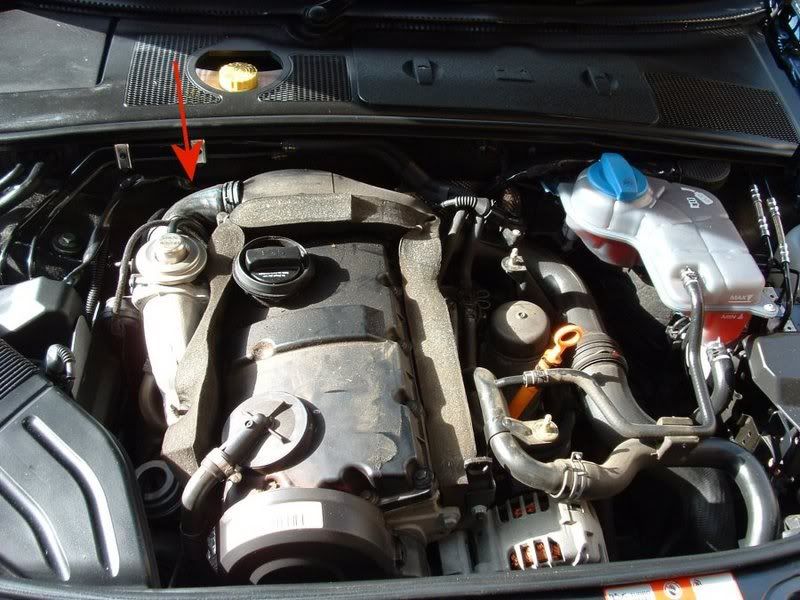
The G62 sensor is positioned at the back left hand side of the engine, as shown with the red arrow in the picture above.
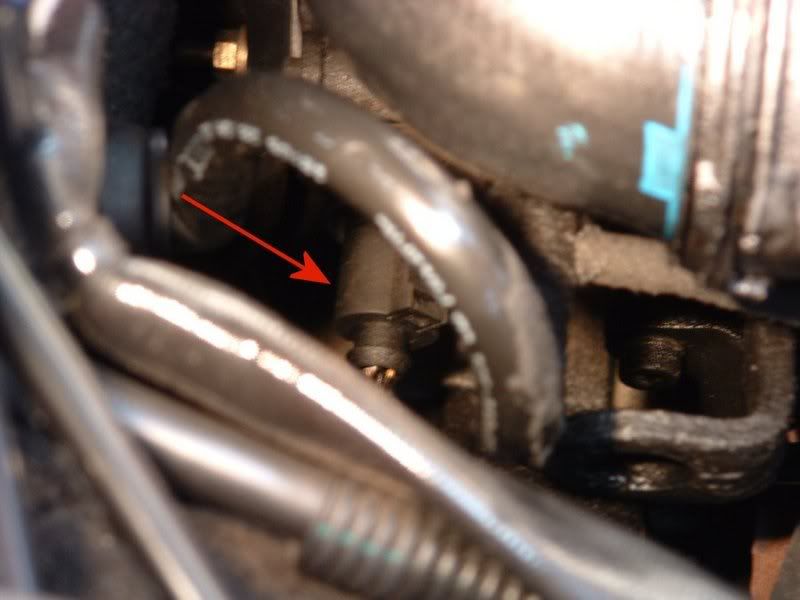
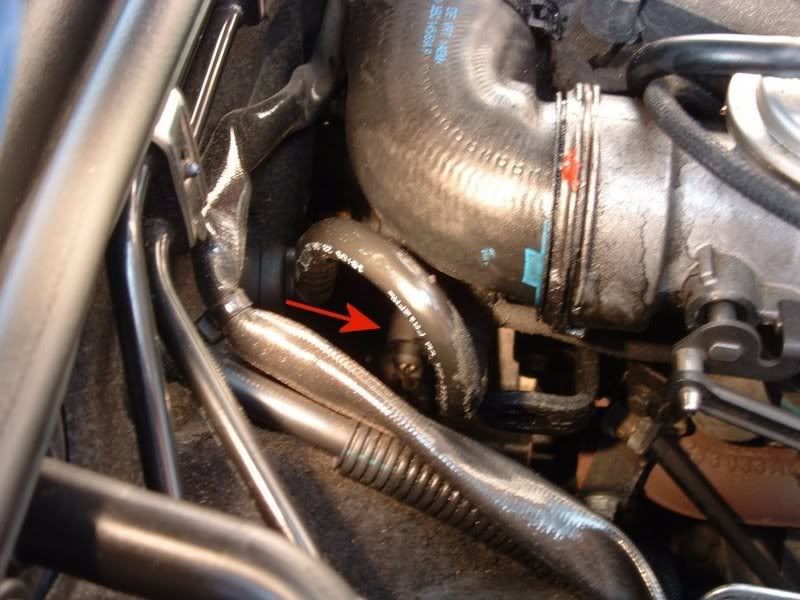
You can see the wiring harness going into the temperature sender in the two pictures above.
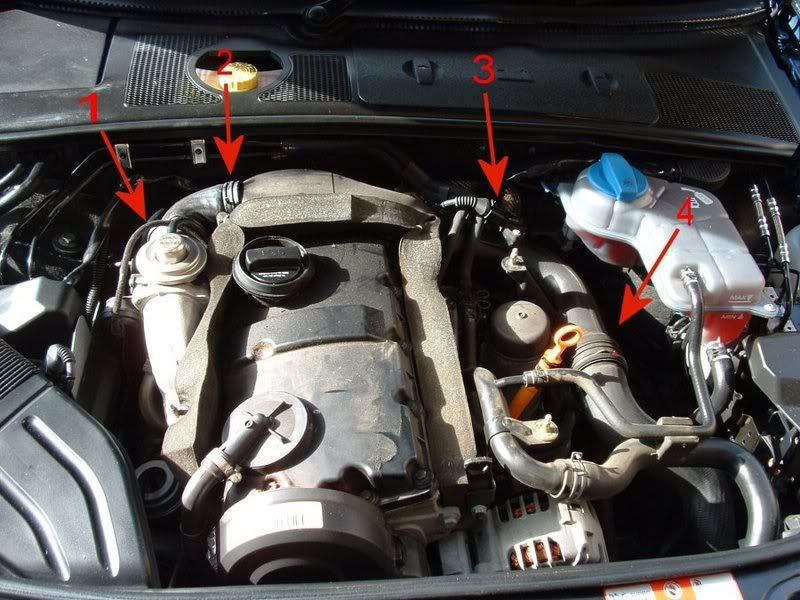
It is best to remove the main air hose to get better access to the sensor.
In the picture above I removed a small bolt holding the air hose in place (the location of this bolt is numbered 4), I then disconnected the sensor from the air hose (numbered 3). I then proceeded to remove the small section of air hose to get better access to the sensor (clips arrowed 1 and 2 above).
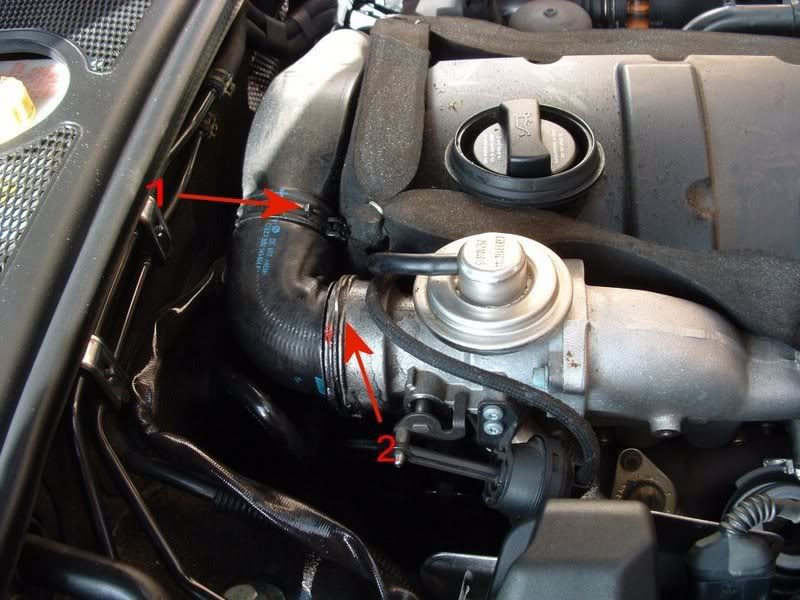
A close up of the air hose section we want to remove is shown above. I removed clip numbered 1 above followed by clip numbered 2 above and removed that small section of hose.
Alot of Audi forums on the Internet recommended removing the wire harness from the sensor first, but I found this impossible and after 30 minutes of swearing, I decided to remove the entire sensor with the wiring harness attached.
To do this you should first have your new sensor to hand, you should mount the rubber seal on the metal part of the sensor ready for a quick swap over. You should also have your retaining clip to hand.
I found it best to have a very small screwdriver on hand, to pull the retaining clip off. The clip is positioned underneath the sensor and is removed by pulling straight down on the clip.
At this point I removed the sensor and I started losing coolant. A quick feel in the exposed hole for the old rubber seal and I was ready to push the new sensor in. I found at this point that the new sensor held in the hole without the retaining spring, so I went ahead and removed the wire harness from the old sensor and attached it to the new sensor.
Now you have the fun of trying to push the new retaining clip in to hold the sensor in place.
The clip is pushed in from the bottom, underneath the sensor, a few moments feeling around and I got it in place in about 5 minutes, the first few attempts were a bit of a pain, but I quickly got it in.
Now you need to put your air hose back together. This was a bit tricky, but I found it best to attach clip numbered 1 followed by 2 in the picture below. I then reattached the sensor unclipped from the air hose and bolted the air hose back down that was previously removed.
Now your new sensor is in place and you need to top up the coolant reservoir. If you have been quick you shouldn't have lost too much coolant.
I lost about a litre and topped the coolant reservoir up with 50/50 coolant/distilled water. When I topped up I turned the car on and put the heating on High and opened all the vents. I then found the coolant needed topping up again. Ensure the cap is placed back on the coolant reservoir before the test drive!
After a test drive I checked the coolant again and topped up a tiny bit and then put the engine cover back on the car.
I then plugged my vag-com cable in and cleared the fault code related to the coolant temperature sender. I will check the car again in a week for error codes to ensure the error has not reoccured. |
| |
|


|
|
audioc
Site OWNER

Joined: Jan 17, 2003
Posts: 12502
Location: E Bay?
|
| Posted:
Tue Oct 24, 2006 9:10 pm |
|
|

 |
|
Neil_S
Inexperienced
Joined: Feb 05, 2006
Posts: 24
|
| Posted:
Tue Oct 24, 2006 9:48 pm |
|
Cheers mate, it's one of those things that may just help somebody some day, so thought it was worth doing the writeup. |
| |
|
|
|
|
audioc
Site OWNER
Joined: Jan 17, 2003
Posts: 12502
Location: E Bay?
|
| Posted:
Tue Oct 24, 2006 10:26 pm |
|
|
|
|
|
yossarian187
Inexperienced

Joined: May 27, 2006
Posts: 40
|
| Posted:
Wed Nov 08, 2006 12:34 am |
|
thanks for the hard work well written cheers |
| |
|
|
|
|
shaqs77
Needs to get out more
Joined: Apr 14, 2008
Posts: 179
Location: Leicester
|
| Posted:
Mon Oct 27, 2008 12:33 pm |
|
thanks mate. vagcom just told me mine has gone so i'll be ordering the bits and doing it myself |
| |
|

|
|
Fast28
Got Nothing Better To Do

Joined: Feb 05, 2003
Posts: 1147
Location: Gloucestershire UK
|
| Posted:
Mon Oct 27, 2008 1:02 pm |
|
A tip: I found that if you tighten the reservoir cap after releasing the pressure you will reduce the amount of coolant you lose to virtually nothing when you pull out the sensor as you are eliminating the capillary action caused by gravity on the higher placed reservoir. |
_________________

2.8 Cabriolet Final Edition
30v
| Brembos | 993 mirrors | Keskin KT4 | H&R Cup | RS2 front | Jetex | |
|
|
|
|
shaqs77
Needs to get out more
Joined: Apr 14, 2008
Posts: 179
Location: Leicester
|
| Posted:
Tue Oct 28, 2008 1:35 pm |
|
correct me if im wrong but i think you may have got your part no wrong for the sender unit. according to vagcat.com the part no should be 025906041A
http://www.vagcat.com/epc/cat/au/A4/1998/218/57/2635249/
the part number you give for the blue sensor it comes up as a 'oil temperature gauge sender / for vehicles with additional instruments'
if ive got it wrong then i apologise |
| |
|
|
|
|
jas11n
Site ADMIN


Joined: Nov 21, 2003
Posts: 14191
Location: Durham, United Kingdom
|
| Posted:
Tue Oct 28, 2008 3:48 pm |
|
This has been mentioned more than once chaps.
Vagcat is rubbish. LOTS, and I mean lots of mistakes on that site.
The part number Neil gives for the blue sensor is NOT an oil temp gauge sender. It's a mutlifunction water temp sensor.
The Vagcat number of 025906041A is a two pin sensor for models with air-con only and was never fitted to any model after 1997.
Be wary of Vagcat, whoever took the info from the FA and applied it in HTML on that site, was NOT very accurate.
If you want to start searching part numbers, do yourself and your wallet a favour, and use the FA  . .
Jase..
 |
_________________
2001 Avus Silver RS4.
2004 A4 Avant 1.8T quattro Sport LE..
1995 S2 Coupe - sold
1995 A6 Avant TDi - sold
1993 80 TDi - sold
1990 90 2.3 auto - scrapped
1989 Coupe 2.3e - sold
1990 cq20v - sold
1990 80 2.8 quattro - sold |
|

|
|
shaqs77
Needs to get out more
Joined: Apr 14, 2008
Posts: 179
Location: Leicester
|
| Posted:
Tue Oct 28, 2008 4:18 pm |
|
| jas11n wrote: | This has been mentioned more than once chaps.
Vagcat is rubbish. LOTS, and I mean lots of mistakes on that site.
The part number Neil gives for the blue sensor is NOT an oil temp gauge sender. It's a mutlifunction water temp sensor.
The Vagcat number of 025906041A is a two pin sensor for models with air-con only and was never fitted to any model after 1997.
Be wary of Vagcat, whoever took the info from the FA and applied it in HTML on that site, was NOT very accurate.
If you want to start searching part numbers, do yourself and your wallet a favour, and use the FA .
Jase..
|
okay ive been told!! 
by the way, what FA???  |
| |
|
|
|
|
AlanCoke
Audi Nut
Joined: Jun 20, 2007
Posts: 55
Location: West Yorkshire, England
|
| Posted:
Tue Dec 23, 2008 8:28 pm |
|
Hi,
I have a B6 - 3.0L V6 Audi A4 and the yellow engine symbol came on about 2 weeks ago and I wondered if anyone could help me?
Sequence of events:
Took the car to a hand / jet wash and had no problems during the clean.
Drove around 3 miles to a shopping mal.
Came back to the car and for the first time ever it missfired and stopped when trying to start the car.
Tried several times to start it and it just cauught and then ran OK for the 5 mile trip home.
Noticed the yellow engine symbol was on.
Out came the ebay Vag-Com software and it said:
Address 01: Engine
Controller: 8E0 909 559 H
Component: 3.0L V6/5V
Coding 0011751
1 Fault Found
16500 - Engine Coolant Temp. Sensor (G62): Implausible Signal
P0116 - 008 Signal Intermittent
Readiness 0000 0000
Looking at the post above suggests that it's the G62 sensor that's at fault but this post is for a four cylinder engine not a V6.
I cleared the code thinking that water had somehow got into the wrong place and for 2 days it was OK. On booting the car the yellow engine light came back on. It's still on but I have left it on just in case someone asks me a question re this fault code.
My car gets to 90 Degrees after a few miles and never seems to move from that point.
On Vag-Com monitor one temp moves slow between 90 and 100 Degrees over minutes, the other tem is around half that value but does not seem erratic. I can only think that the first temp is the engine temp and the second one is the coolant temp but it does not say anywhere.
Could anyone confirm that it's this sensor at fault, the part number required and where the heck is this sensor on a V6 (can't even see the engine)!
Thanks,
Alan. |
| |
|
|
|
|
AlanCoke
Audi Nut
Joined: Jun 20, 2007
Posts: 55
Location: West Yorkshire, England
|
| Posted:
Sun Jan 04, 2009 2:18 pm |
|
OK so here goes with an update.
Bought a sensor from GSF for £18.98 and changed it tonight, what a bitch of a job!!!
Sensor:
Audi part number is - 059919501A, the sensor is dual and it’s green.
GSF’s part number is – 93494D
Seal:
Audi part number – N90316802
GSF’s part number is – 17953A
This sensor is exactly where the posts / drawings say it is so thanks for the info.
Because of the air inlet pipe and cooling pipes it’s almost impossible to get at it without taking the inlet chamber and everything else off. In the end I took off the inlet feed pipe section with the air mass meter and then remove some clips and cable ties from behind the left hand cylinder head, this just allowed me to get one hand onto the sensor and remove it with my finger tips but it took me over an hour (I am not a car mechanic but I am an engineer).
After this sensor was replaced the temp came up to 90 Degrees and after a brisk run out and then a stand in the garage with the engine running the fans kicked in so that’s a RESULT!!!
Thanks for everyone’s advice and information; it’s been a great help.
Just hope the dam thing does not leak now and the management light stays off.
Thanks,
Alan... |
| |
|
|
|
|
webf2010
Newbie

Joined: May 03, 2011
Posts: 2
|
| Posted:
Thu May 05, 2011 8:32 am |
|
|
|
|
|
masterlink
Inexperienced
Joined: Feb 22, 2012
Posts: 24
|
| Posted:
Sat Jul 12, 2014 1:38 pm |
|
I have replaced the coolant sensor on my A4 Avant 1.8 and it cured the low temp gauge reading and it ran at 90 degrees for a week and now it is reading only 70degrees. I notice coolant is leaking slightly around the sensor housing and i cleaned the housing carefully before assembly. Is there a gasket sealant recommended I should use to stop the leak? |
| |
|
|
|
|
akash87
Newbie
Joined: Nov 19, 2014
Posts: 1
|
| Posted:
Wed Nov 19, 2014 11:51 pm |
|
| Neil_S wrote: | Just did this job today and found some better ways to do it, over what I've read on some Audi sites so thought I'd publish my own guide.
The G62 temperature sensor is a fairly common component to go on the Audi A4, typically this can be diagnosed via vag-com codes such as 17664.
Tools required
Socket set
Small flat headed screwdriver
Pliers
Parts needed
Some G12+ coolant - You can get this from eurocarparts or GSF car parts, 1 1/2 litre for about 5 quid
Some distilled water - You can get this most places, even supermarkets sell it now
Audi parts
A check of the sensor before ordering the parts (a torch is handy) revealed the sensor casing was black (this has been superseeded by a green sensor for which the part number is listed below). On some VAG cars, a blue temperature sensor is installed and this has a separate part number 078 919 501B).
1 x 059 919 501 A - Dual temperature sender
2 x 032 121 142 - Retaining Spring
1 x 903 168 02 N - Round seal
I got these parts from Vagparts for about £20 delivered. I would suggest you order 2 retaining springs. They are plastic clips and you can easily drop them, best to have one extra on hand just in case.
Before you start, make sure the engine is cool. Do not do this on a warm car. It is best if you leave the car overnight to fully cool down first.
(Optional) You may want to remove the plastic engine shield so that any coolant lost during this process falls onto the ground (or suitably positioned tray). I decided instead to leave the engine shield in place and flush the leaked coolant with a watering can. I managed to capture most of the lost coolant for safe disposal. Animals are attracted to the coolant due to it's sweet smell, so it is best to ensure your driveway is flushed of any leaked coolant when finishing this job.
Start by removing the engine cover. Pop off the three caps with a small screwdriver and unscrew the bolts. Lift off the oil dipstick and remove the engine cover, replace dipstick.
In order to make sure all pressure is relieved in the coolant system, remove the cap from the coolant reservoir.
The G62 sensor is positioned at the back left hand side of the engine, as shown with the red arrow in the picture above.
You can see the wiring harness going into the temperature sender in the two pictures above.
It is best to remove the main air hose to get better access to the sensor.
In the picture above I removed a small bolt holding the air hose in place (the location of this bolt is numbered 4), I then disconnected the sensor from the air hose (numbered 3). I then proceeded to remove the small section of air hose to get better access to the sensor (clips arrowed 1 and 2 above).
A close up of the air hose section we want to remove is shown above. I removed clip numbered 1 above followed by clip numbered 2 above and removed that small section of hose.
Alot of Audi forums on the Internet recommended removing the wire harness from the sensor first, but I found this impossible and after 30 minutes of swearing, I decided to remove the entire sensor with the wiring harness attached.
To do this you should first have your new sensor to hand, you should mount the rubber seal on the metal part of the sensor ready for a quick swap over. You should also have your retaining clip to hand.
I found it best to have a very small screwdriver on hand, to pull the retaining clip off. The clip is positioned underneath the sensor and is removed by pulling straight down on the clip.
At this point I removed the sensor and I started losing coolant. A quick feel in the exposed hole for the old rubber seal and I was ready to push the new sensor in. I found at this point that the new sensor held in the hole without the retaining spring, so I went ahead and removed the wire harness from the old sensor and attached it to the new sensor.
Now you have the fun of trying to push the new retaining clip in to hold the sensor in place.
The clip is pushed in from the bottom, underneath the sensor, a few moments feeling around and I got it in place in about 5 minutes, the first few attempts were a bit of a pain, but I quickly got it in.
Now you need to put your air hose back together. This was a bit tricky, but I found it best to attach clip numbered 1 followed by 2 in the picture below. I then reattached the sensor unclipped from the air hose and bolted the air hose back down that was previously removed.
Now your new sensor is in place and you need to top up the coolant reservoir. If you have been quick you shouldn't have lost too much coolant.
I lost about a litre and topped the coolant reservoir up with 50/50 coolant/distilled water. When I topped up I turned the car on and put the heating on High and opened all the vents. I then found the coolant needed topping up again. Ensure the cap is placed back on the coolant reservoir before the test drive!
After a test drive I checked the coolant again and topped up a tiny bit and then put the engine cover back on the car.
I then plugged my vag-com cable in and cleared the fault code related to the coolant temperature sender. I will check the car again in a week for error codes to ensure the error has not reoccured. |
Thank you very much fo the write up. It made my job soo much easier. |
| |
|
|
|
|
|
|


